


Grimm Audio UC1 - Converter, USB Audio-Interface & Monitorcontroller

Setting the UC1 up
Setting the Grimm UC1 is as simple as it can be:
Connect your computer (we use a MacBook) via USB as well as your speakers, select the right output – ready to go. No clumsy or stuffed Software window that easily gets in the way and clutters
Your monitor screen. It just works! After the first 10–15 minutes – as with any new device – you spend a bit of time figuring out how the functions are laid out and how the navigation works. You do need a short familiarisation phase, but once you’ve gone through it the workflow is straightforward and reliable. Many users report the same thing: there is a brief learning curve at the beginning, and after that the UC1 feels very intuitive in daily use. The software panel is as straight forward as you can get and is clearly structured. No clumsy or crowded GUI, just the essential functions, which helps focussing on critical tasks and doesn't distract.

Besides its pure role as a monitor controller and studio interface, the UC1 is also getting serious attention from high‑end hi‑fi listeners. We can confirm that – we’ve been listening to it a lot in our hi‑fi test studio, and it is definitely worth a closer look if you are into high‑end playback.

Design, feel and user interface
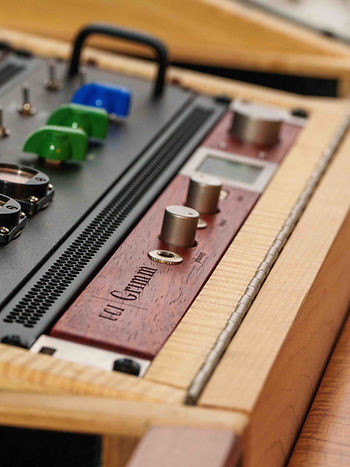
Jog wheel, display and navigation
First thing to notice when dialing it in, is the Jogwheel for Master Volume. It feels really tactile and moves slightly with the movement you make while turning Volume up and down. You can also switch the listenback mode when tipping the volume knob to mute the main speakers and operate in headphone mode only. It just makes fun to operate with it and doesn't feel so sterile as many others do.
Two buttons on the right of the display
let you navigate through the different settings of the UC1.
The top button lets you scroll through different menu pages to adapt the unit to your needs and dive deeper into the settings (the second button acts as an exit/back button). The jog wheel is used to scroll up and down between parameters, and once you click on a parameter, you can step through different modes and options using the jog wheel.
The display is good to see, even when the unit is not in direct reach.
The option to dim the display comes in handy, whether it’s to see signals clearly or turn it down to focus on mixing or mastering.
The meters can be switched between a simple three‑stage overview in the main screen and a high‑resolution meter page that lets you cycle through inputs & outputs, inputs only or outputs only, with peak‑hold and clear channel naming. Next to the display there is an extra 'iput', which lets you connect any type of external playback device such as laptops and smartphones via USB - ideal for quick comparisons or referencing with a client.
Headphone amplifier and front‑panel inputs
Instrument input
Moving further to the left on the unit there are two inputs with dedicated TRS sockets.
The one on the left is an instrument input, which comes in handy when you need to record a guitar spontaneously to add some final overdubs to a production using DAW amp simulations. No extra DI box, no additional interface – just plug in and go.
Headphone amplifier
The other input feeds one of the UC1‘s strongest sections in our opinion – the built‑in headphone amplifier. It is powerful enough to drive demanding studio headphones and planar magnetics without breaking a sweat and offers plenty of clean headroom (600 Ohms, 30 mV).
Listening through some references with the Audeze LCD‑X paints an absolutely neutral canvas where music just happens. It simply shows what’s there without colouring the sound, yet it doesn’t come across as sterile.
The differences of each individual production and era it was made in really come forward – it feels like an imprint or timestamp of a musical moment. We haven’t heard those differences presented like this on any audio interface or converter yet.

The headphone amp is perfect for quick comparisons or check backs, but could easily be used in a fully headphone‑driven studio – there is nothing fatiguing about it.
We’ve heard other standalone headphone amplifiers for 1500 € and above that are not as accurate as the one in the Grimm Audio UC1. Listening and checking back is like looking into a clear mirror of what is happening, without sounding clinical.
The headphone amplifier’s volume knob also feels well made and moves smoothly when turning up or down, which creates a pleasant feel. Small detail, but so important when you constantly switch between speakers and headphones.
On the left corner of the unit the “UC1 | Grimm” logo is laser‑engraved into the beautiful padauk wood front.
Ins and outs – connectivity and routing
INS and OUTS
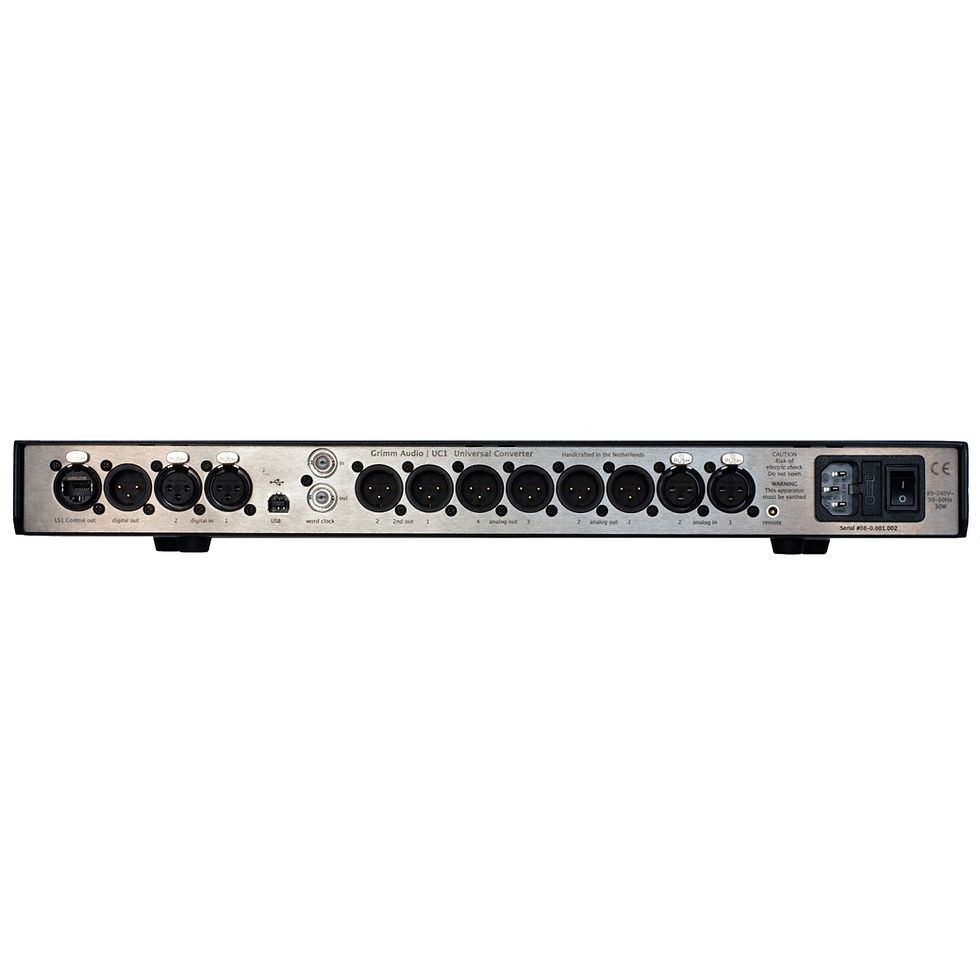
The AES/EBU input and output give you a solid professional digital connection for outboard gear, digital master recorders or a separate DAC. You can feed a digital signal into the UC1 or send a digital feed out to another device while still using the UC1 as your main monitor controller.
On the back panel, the main USB‑B port connects to your computer and carries up to 18 channels of audio (back USB), while the front USB input provides an additional 2‑channel USB feed for quick external playback devices, laptops or mobile devices. This makes it very easy to compare mixes from a client’s laptop or a streaming reference against your DAW session without repatching your studio. The UC1 offers BNC connections for word clock, which makes it easy to integrate it into more complex studio clocking setups or to sync external devices to its internal ultra‑low jitter clock. If more than one BNC port is needed, the CC1 is an excellent add‑on to expand your clocking options, especially in setups that already use an UC1 as part of their digital setup.
Analog outputs and speaker connections
The first analog out is destined to work with the Grimm Audio LS1Be active loudspeaker system and therefore reserved for it. If you are using LS1a or LS1be, this is the most direct way to hook them up.
We did connect our main speakers to the second analog out within seconds. These balanced line outputs can be used for your main nearfields, midfields or whatever you consider your primary monitoring system.Additional analog outputs can be used for a second pair of speakers, a subwoofer, external meters or parallel recording feeds, depending on how you like to set up your room.
All the ins and outs are listed for you at the end of my blog, so you have a complete overview of what the UC1 offers in terms of connectivity and routing options.
Converter design and technical background
D/A and A/D implementation
The converter
The UC1 uses famously known AKM 4396VF as D/A,that is not especially special at this point.
However, while some mock about that most brands do use the same converters mostly, this is not the point where the magic lies.
It is all about implementing the DAC into the circuit and optimizing it, so it can do its job as precise and resolving as possible.
Grimm took a lot of their knowledge and RND.Preamps, the quality of power supply, taking care of vibrations an the whole design of the circuit is where a converter/interface distinguishes itself from another - with an outcome that can be completely different in sonic characteristics.
The ADC is a TI PCM 4202 is a highly performant converter (Burr Brown) and has got 118db dynamic range and a THD+N of -105db.
Clocking, specs and Measurements
Specs and Measurements
Same underlying clocking technology that Grimm uses in their standalone master clocks, namely the CC1 and CC2, is built into the UC1. It comes with an ultra‑low jitter clock and a refined PLL design that keeps things remarkably stable.
There may be even more extreme converters out there for specific measurement benchmarks.

How the Grimm UC1 sounds
General sound signature
How it sounds
We already know Grimm’s sound signature quite a bit and the UC1 is unmistakably a Grimm Audio unit – you can tell it immediately by its sound.
When listening to well‑known reference tracks, it is interesting to notice how the UC1 produces a phantom centre that reminds us a bit of their hi‑fi flagship Grimm Audio MU2.
Our other AD/DA converter, the UAD Apollo x16, is not as forward and holographic as the UC1.
That said, things change quite drastically when we connect the Grimm CC2 master clock to the UAD, which is our regular studio setup.
One of the weakest points (besides the fact that it’s a good unit) of the x16 is its clocking, that’s for sure.

Built‑in clock versus external clocking
Same underlying clocking DNA is built into the UC1, so it comes with a proper and ultra‑low jitter clock that is remarkably accurate.
There may be more pristine converters to compare on paper, but the combination of Grimm’s clocking, analogue design and conversion gives the UC1 a very complete and trustworthy sound, which is ultimately what matters when you are making decisions.
Testing the UC1 in a mastering chain
Test setup, cabling and philosophy
What made us specifically curious in our setup is to take a closer look at the analog‑to‑digital conversion, using the UAD x16 as digital‑to‑analog converter while doing a print through our mastering chain.
The chain is small, but optimised in a lot of aspects, be it cabling with Grimm SQM and Audiomica Rhod Reference, as well as Audiomica Magnet Gold and Jasper Reference power cords for all units involved. For context: I’m using the UC1 in a compact but high‑quality mastering chain here – IGS S‑Type bus compressor (rack version), a custom Kultrumm Audiolabs Selk Nam 436c Vari‑Mu tube compressor, and a TK Audio TK‑lizer 2 mastering EQ – and it integrates really well in that setup.
We use a MacBook Pro with Pro Tools via Thunderbolt and a galvanically isolated Thunderbolt hub (also powered with Audiomica Magnet Gold), which helps keeping the signal clean as well.
The Grimm UC1 is connected via USB (Audiomica Cinna Excellence).
Cables and power distribution are another aspect where opinions differ wildly, even among mastering engineers. Some call it snake oil, others won’t work without their preferred looms and power cords. In our room, with a highly revealing monitoring chain, we do hear consistent differences when using high‑end signal cables and well‑designed power cords – especially in terms of noise floor, spatial focus and low‑level detail. That’s why we mention the specific cabling in this review: not to sell magic, but to be transparent about the conditions under which we evaluated the Grimm UC1 and its conversion.
However, we ended up with two core test scenarios:
UAD x16 D/A + Grimm UC1 A/D
Grimm Audio UC1 AD/DA
Scenario 1 – UAD x16 D/A conversion + Grimm UC1 A/D
Interesting to hear: the result clearly displays the signature of the UAD x16. It sounds thick and phat, but not super precise, unless you have taken care of this before and worked around (or with) it while mixing and mastering.
When the x16 receives the clock signal from the UC1, we can clearly hear an improvement. The low end tightens up, transients become more focused and the stereo image snaps into place in a way that makes balances easier to judge. It still carries the thick and slightly “phat” signature of the x16, but timing and definition feel more controlled, so you get the character of the Apollo with a noticeably more precise and stable presentation.
The Grimm UC1 on the A/D side does a very good job of capturing exactly that – you hear the weight and colour of the x16, but the print itself feels clean and stable. In other words: the UC1 does not “fix” the UAD, it simply documents what is coming out of your analogue chain in a very controlled way.
Scenario 2 – Grimm Audio UC1 AD/DA
Using just the UC1 for AD/DA is a different story.
With the Grimm UC1 and its two converters working as a standalone front‑end and back‑end, it is really impressive how calm, accurate and spacious the print sounds.
Listening through the Audeze LCD‑X with the built‑in headphone amp reveals colour, sound aesthetic and the crafting of the production like looking at a calm and ripple‑less mountain lake.
Very pleasing. With this conversion, you get one step closer to really understanding what your analogue chain (or plugin chain as well) does to the audio, probably allowing you to make different or more refined choices in terms of EQ, compression and overall loudness.
Cons
One thing that could have been solved better is the power switch – it sits right next to the AC input on the back of the unit and can be hard to reach, depending on where you place it in your rack. If the UC1 is your main hub, it therefore makes sense to keep it within arm’s reach. You should also remember to turn off your active speakers first at the end of a session and only then power the UC1 off, otherwise the speakers will respond with a loud “plop”, which you definitely want to avoid.
Conclusion – who is the UC1 for?
If you’re looking for a mastering‑grade USB interface and monitor controller that fully respects the art of the mixing engineer and pinpoints every aspect of it, the Grimm Audio UC1 is for you. The UC1 can act as the central hub of a high‑end mixing and mastering setup, combining transparent conversion, precise monitoring and flexible routing in one unit.
This is an important aspect for all genres of music. If you are very aware of how much you want to colour the sound (or stay as true to the original as possible), the UC1 makes it easy to display the amount and differences between pre‑ and post‑mastering in a very well‑defined way.
The UC1 is also an excellent fit for those who work in the realm of classical music, jazz and the recording/mixing of natural instruments in general.
Presenting and imaging classical music or natural instruments is a king‑discipline and a strong indicator of build quality on a high level – it is not that easy to get this right, yet the UC1 presents those instruments with pinpoint accuracy, high resolution and clearly audible contours and shapes. 3D imaging, depth and layers, reverb tails – all are clearly perceivable.
It would be too narrow‑minded to reduce it to this single use case, though. The Grimm Audio UC1 is a mastering‑grade USB interface and monitor controller that can seamlessly take the role of the central hub in a high‑end mixing and mastering environment.
Thanks for reading – and if you want a demo, get in touch.
Best,
Fabian Falkenstein
UC1 Features
18 channel back USB & 2 channel front USB
4+2 analog outputs, 4 analog inputs
4 digital outputs, 4 digital inputs
Versatile monitoring features
Ultra-low jitter clock with hybrid PLL
High performance phones output
Foldback for latency free monitoring
Sample rates from 44.1kHz up to 192kHz
Word clock in- and output
Retail price 4998€

Comments